I'm a huge fan of Paul Battley's iplayer-dl. In brief, it downloads videos from iPlayer by pretending to be an iPhone. The .MP4 files it grabs are suitable for playback on most mobile devices (480 x 272 and stereo audio). It also downloads radio programmes as .MP3 files. I was…
This is part of my redecentralisation efforts to liberate my videos from YouTube. MPEG-DASH is a simple method of streaming videos which doesn't require any specialised server software. You convert a high resolution video into a series of smaller resolution videos. You chop each of the videos up into several…
I collect my experiences with panorama photos here. https://360x180pano.blogspot.com/2022/06/smartblend-still-works-with-2021-hugin.html https://360x180pano.blogspot.com/2022/06/smartblend-still-works-with-2021-hugin.html
I have just completed a series of hand-held panorama photos during my trip to Kelambu Beach, Sabah, Malaysia, and uploaded results and pictures to Google Maps and Photos.
My older works are still preserved in Google Maps done with older versions of Hugin.
The camera used was Sony A5100 mirrorless. The cheapest and lightest of the NEX class cameras but no longer updated. It still has a 24 Mp sensor butsufficient for Google Maps because it only accepts 16000x8000 panorama photos.
It has bracketed exposes. I tried +-3 EV hand held. The ghosting appears because alignment with the same stack is poor. There are errors after optimising these stacks using hugin allign stack feature.
The HDR menu in the sticker does not work, sometimes. However, the user output works all the time. I even managed to stitch single photos but its quality is not as good as raw picture processing usinng Sony's raw software Imaging Edge Desktop's D-range optimizer at 100% manual setting. Sometimes it creates more noise but HDR stiching using hand-held bracketed stacks.
Hugin was able to create the stack numbers automatically if the EV exposure bracketing setting is input into the EXIF of the picture. I used the stock lens 16mm-50mm F3.5 when the sun is bright. For the sunrise and sunet photos, I used the manual Samyang 12mm F2 lens. Then I need to assign the stack number manually.
Smartblend is better than the latest builtin blending software used by Hugin. It still leves dark areas at the stiching areas but it appears sharper than previous Enblend stiching and appear faster as well.Feels as fast as Smartblend.
Using Smartblend is actually easy but do not use the User outputand make sure the output files are not cropped. It is in the Nona setting. Just input the Smartblend executable file as the alternate Enblend in Program settings. However, I still prefer to run the Smartblend using the Enblend GUI.
Enblend GUI has the best user interface ever. It shows the progress in % and time left. Once the project is completed, the total time is shown. You can save the project setting of the input and output files. The only weakness is the inability to delete the input files from the GUI.
https://goo.gl/maps/bZ5LwtQHpQTXQ5BaA
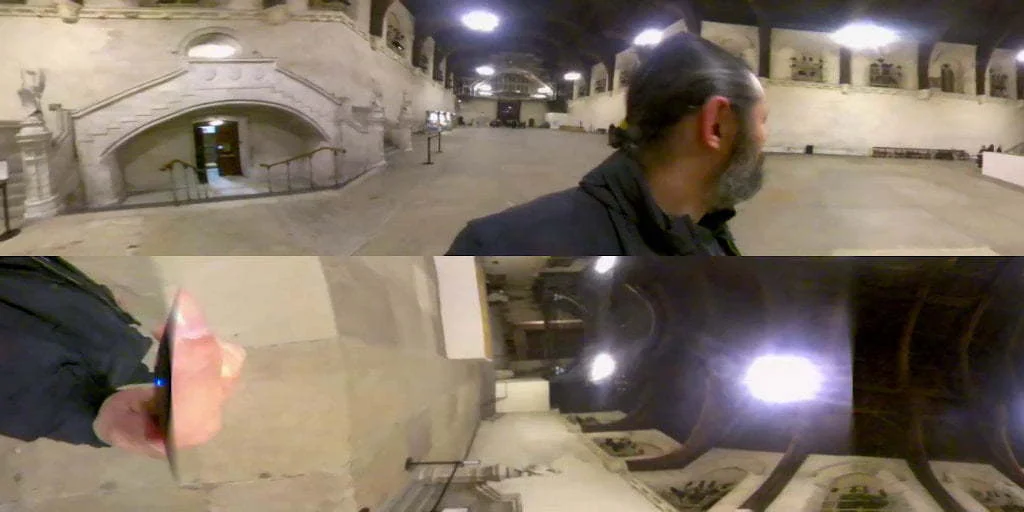
I identify them by the lack of dicontinuities at the horizon because I have learned to zoom in as closely as my computer processing allows and manually move a set of vertically linked pictures together, i.e. the centre, slightly up, and slightly down. The top picture with an estimated pitch of 90 degree is usually difficult to link so are set manually. The bottom picture with pitch of 90 degree, is taken to remove my legs so are not as aligned as the other pictures, so should cause more parallax error. No need to edit out my feet, I just mask them out. Even mys shadows disappear using builtin blending but reappeared using Smartblend. Multiple pictures of moving people or shadows will be cancelled by Enblend-type blender but not Smartblend. Smartblend has the ability to choose the best picture which contributes to its sharpness.
Take a look at Kelambu Beach and Max Campsite for pictures and panoramas. It is the best beach in the world, but the poorest in the world, despite its immense resources, the largest producers of oil palm, timber and petroleum in Malaysia. If only Malaysia had diverted the huge subsidies to the poor through direct cash handouts, poverty will be removed from Malaysia entirely instantly.
Smartblend is still faster and better than the builtin blending tools in Hugin 2021 version.
I thought it no longer works, but actually I forgot the procedure the run Smartblend usinng Enblend GUI, still the old version. Do not crop the remapped pictures during nona stitching. By default it should be uncropped.
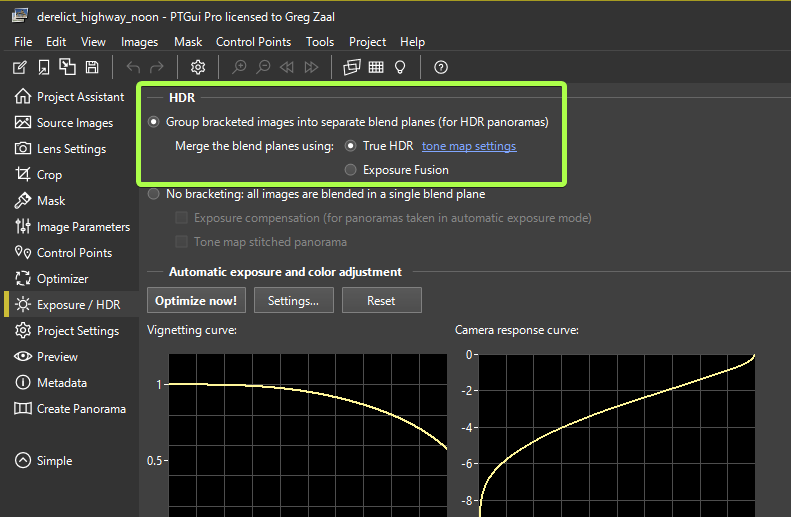
If you don’t use the script above, also be sure to enable True HDR
mode to be able to output to HDR formats (my script does this
automatically):
4.7. Export the HDRI
Finally, double check all the output settings are correct (100% optimal resolution, HDR only, no LDR) and hit that Create Panorama button 🙂
Congratulations, you’ve created an HDRI!
You can view this HDRI in a few different ways, my favorite being with LizardQ Viewer, or just Photoshop/Gimp/Affinity/Krita/Blender.
The Next Steps
You now know everything you need to create a basic HDRI, but if you really want to create a quality HDRI that could be published on HDRI Haven, there is still more to learn.
Removing the tripod from the bottom of the HDRI (coming soon)
I have just discoverd 360cities while viewing google earth. I saw these symbols on Google Earth a few years back but don't bother until I start viewing Google street views of Singapore. I read in the news about the controversies created by Google for taking these photos. I didn't realise there are so many of them and pano viewers are good and fast enough for low-end broadband.
Unfortunately Google Street only take panoramic pictures of streets, not inside compounds and buildings. That is where amateurs and professionals can contribute, until Google start providing pano pictures tourist attractions all over the world, but I doubt it will be able to meet the requirements of most people, just as photographs of sites had not stopped tourists bringing in their own cameras of all types.
By 2010, its photographer has published on the net the largest panoramic picture on Earth. Who says higher Megapixel cameras are not required? http://www.360cities.net/prague-18-gigapixels
High resolution cameras are not useful if you just want to print 3R photos or watch on you PC or TV. Even Full HD TV and monitor can show a 2Mpixel quality only. They are most useful for panoramic pictures.
There are many sites for published 360 degree panoramic pictures but only 360cities.net are integrated with Google Earth. I though it was Panoramio and actually published it there but it does not have a pano viewer. In 2007 there are many more panoramio pictures in Google Earth than 360cities pictures so I don't click 360cities that much, until I started looking at Singapore streets for the intention of planning my trip to Singapore, last week.
Without going to Singapore, I feel confident that I won't get lost in Singapore. Mind you, I lived in Singapore for 3 years but that was more than 20 years ago.
There are not many 360 degree panoramic pictures for Malaysia and Singapore in 360 cites. For Malaysia I noticed that there are 2 prolific photographers but the number of pictures is only about 50. I have uploaded more than 50 of my panoramic pictures in RC Flight Sim resolution and full resolution but at the highest compression rate because of problems uploading.
I have just started but it could be the best way of publishing panoramas.
I have successfully uploaded 8192x4096 pictures which I use for RC Flight Simulators but highly compressed to 30% or less so that the image size is less than 2Mbyte. Successfully uploaded but not yet published. They have to view the picture to establish its copyright, which is fair enough.
I tried to upload my pano stiched from 10Mpixel photos resulting in more than 17,000 horizontal resolution but failed so far using my 512Kb/s connection.
360cities is capable of up to: TIFF can be up to 65,536 x 32,768.
The maximum JPEG size is 30000 x 15000.
Uploading should be the problem. Viewing should not be much of a problem because you view only portions at a time and streaming is also done. That should explain why I was able to view many excellent panoramas in 360cities.
Another way to view panoramas is through google "street view" but these are just views from the street of famous cities. Unfortunately my city, Kota Kinabalu, is not so famous so we must resort to 360cities to show it to the world.
Even in famous places such as Makansutra and Esplanade of Singapore still do not have panoramic pictures widely available. I shall visit Singapore this end of January and try to take panoramic pictures of various places that do not have panoramic pictures in Singapore.